Workflow at a glance
This Quickstart guide offers an overview of what you need to get started with ActiveTigger.
Many use cases are possible, as ActiveTigger offers several methodological options. To provide an example, we structure this guide around a common problem in social science research: having more textual data than you could manually analyze.
Example
Let's say you have a dataset of 10 000 newspaper headlines. You want to classify them into "political" and "non-political" categories. It would take you a very long time to classify this manually.
By following the below five steps in ActiveTigger, you can (1) make the manual annotation process easier and (2) train a classifier model that can extend your coding scheme automatically on the entire dataset.
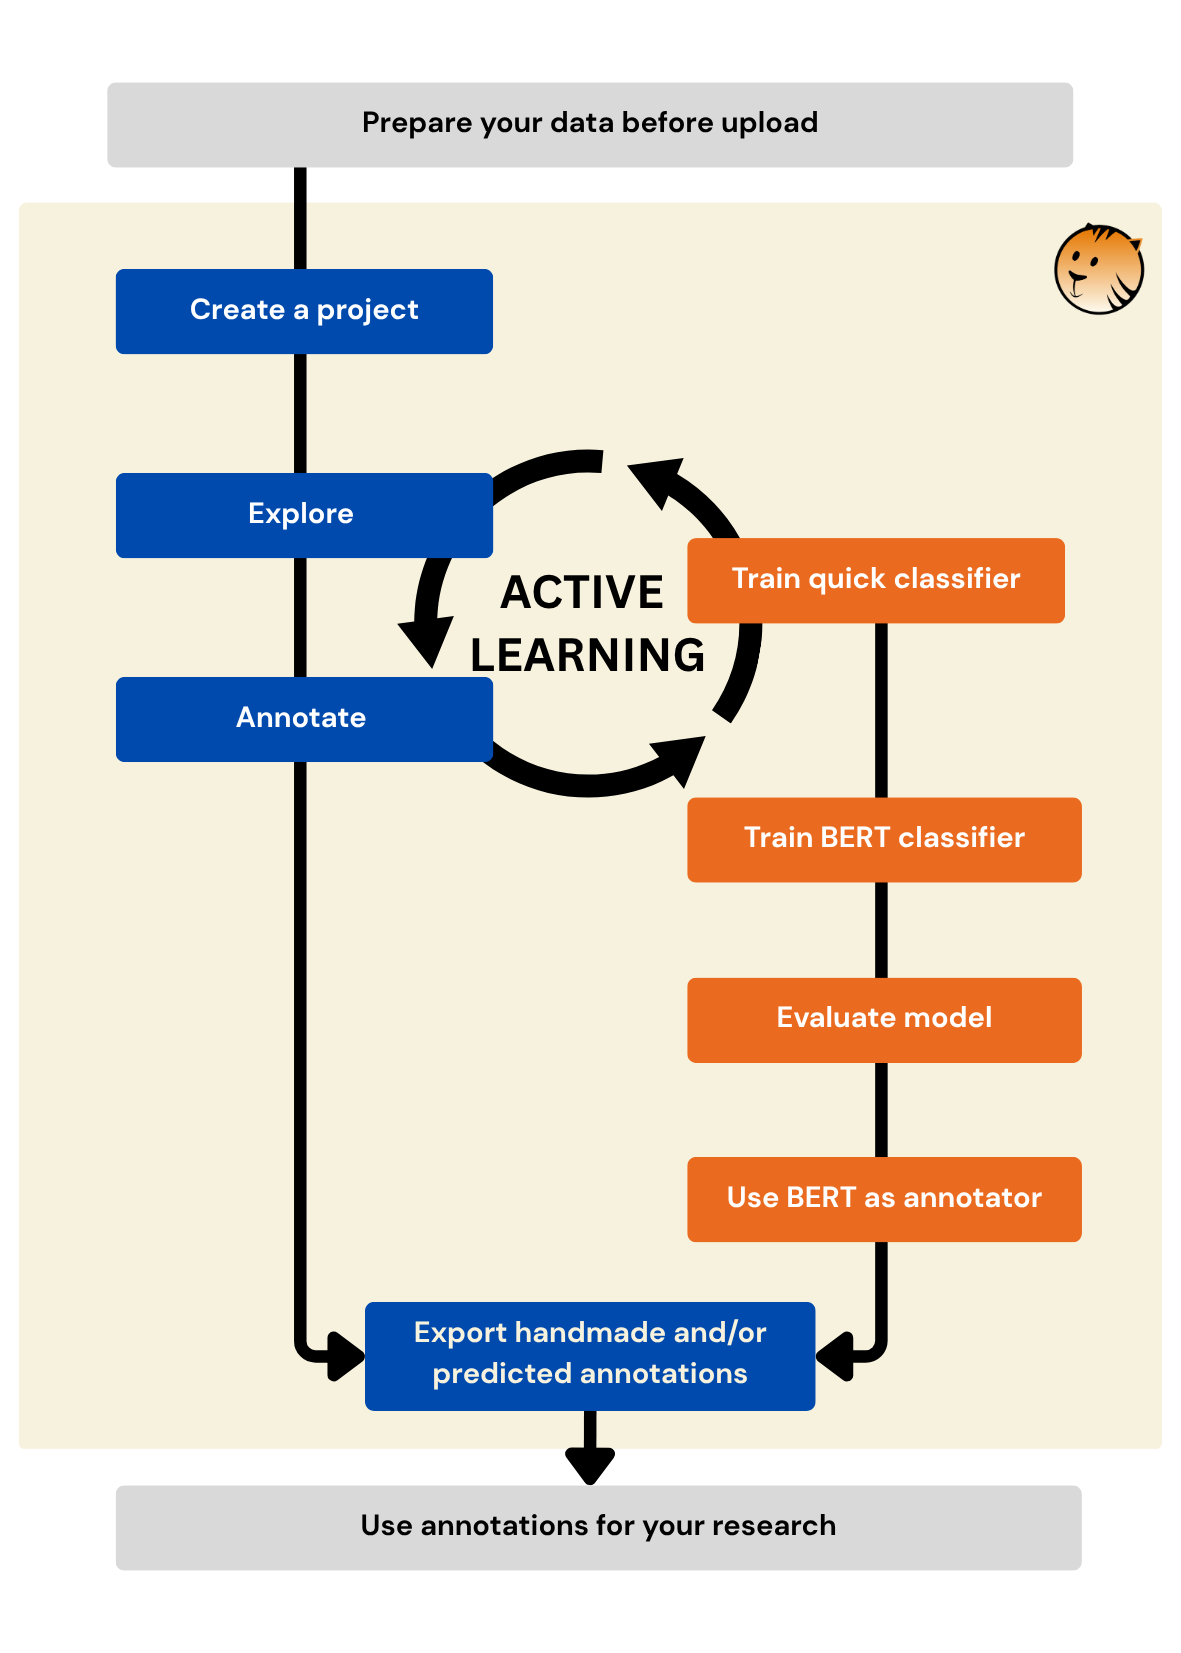
What you'll need before starting:
- A web browser through which you can access ActiveTigger.
- A valid ActiveTigger account from an instance.
- A tabular dataset (CSV, XLSX, or Parquet) where each row is a text unit to annotate.
That's it!
1. Create a project
Go to the New Project screen and fill in:
- Project name — A unique name for your project
- Load dataset from disk — Upload your CSV, XLSX, or Parquet file, with each text element in a separate row
- Id column — Specify the unique identifier for each row. If there is no such column in your dataset, pick "Row number"
- Text columns — Specify the column that contains the text you wish to annotate
- Language of the corpus — Specify the language of your text data (used to select relevant models, but you can also work in languages not listed here)
- Number of elements in the train set — Specify how many elements you wish to import in the training dataset
Optional:
- Context columns: columns to display alongside the text while annotating (e.g. author, date, source). May be useful to understand what you are annotating, but this data is not used by the model.
- Existing annotations: if your file already has a label column(s), you can import it.
- Test set: a held-out sample used later to evaluate your model.
Example
For our example with political/non-political headlines, let's import 8000 text elements in our training dataset (that does not mean we are going to annotate all of them - FAQ - how many rows to import?).
2. Define your annotation scheme
Under the Codebook tab, we can go to the next step: defining our labels.
A coding scheme is the set of labels you'll use to annotate. One scheme is created by default.
Click New label, type your label name, and click  . Repeat for each label.
In our example, we create two labels: political and non-political.
Consider writing a short codebook explaining how to distinguish labels, especially if you work with collaborators.
What is a good scheme?
For a classification task, a good scheme is a scheme for which labels can be assigned without ambiguity to texts. If the classifier is a human, it means that the annotator is able to decide which label to put in each text. If you want to train a classifier, it means that the model is able to assign labels. When you start with a research question, you tend to have complex schemes with a lot of labels. The risk is that some of those labels are ambiguous. We advise a reductionist approach, testing each label with a binary scheme/classifier.
3. Annotate
Next, let's start annotating!
Go to the Tag tab. The interface shows you one text at a time. Read it, click the appropriate label, and move on. ActiveTigger picks the next element automatically.
Initial selection modes:
- Random (recommended to start): picks elements at random.
- Fixed: follows the original order of your dataset.
You can also:
- Add a comment to any annotation (useful for edge cases)
- Go back to re-annotate previous elements
- Skip an element to return to it later
In a session, you can only see each element once to avoid repetition. You can clean the history with the button Clear history (3 items)
Active Learning
For our example, maybe we find that most headlines are not classifiable as political. Going through the dataset in a random order, it takes us a lot of time to find examples of this category. This is where active learning can come in handy.
In "active" mode, a model guesses what label you will apply to a given text, offering you the opportunity to correct it. This can help to speed up the annotation process, either in predicting the element labels or identifying critical cases.
To enable Active Mode, you need to first train a Quick Model. Go to Model → Create new quick model.
In the Tag tab, click on the little tiger face under Active Mode.
When active learning is on, it unlocks new strategies to pick the next element. Read more.
Read more about Active Learning.
4. Train a BERT classifier
If your goal is to automatize the annotation to the full corpus, you can train a BERT-based classifier directly in the interface.
A BERT-based classifier model uses your annotations to learn what kinds of texts should go in each category. Once trained, the model can be used to infer the labels of unannotated text inputs.
Go to Model → Create new BERT model.
The classifier learns how to predict. It is not perfect, and its error rate will depend on the quality of the training. In the Model tab, you can also evaluate your model.
See Model page for more information on the parameters, the Theoretical concepts page for guidelines on how to correctly train a model and the FAQ page for additional pieces of advice.
5. Export
Lastly, export your annotations, models and predictions to carry on the analysis. See Export page for more information.
Best practices
In practice, going through each of these steps requires iteration and careful thinking about your annotation strategy. In this documentation, you'll find more detailed information about each key feature of ActiveTigger as well as advice on best practices.
You may also be curious about:
- how to manage collaboration through adding multiple users to your project and compare your annotations
- how to use topic models to get an overview of what your dataset is about
- how to use generative AI tools in ActiveTigger
Get in touch
If you encounter a bug or have a suggestion, feel free to raise an issue on Github.
We also have an active Discord community used to signal troubleshooting, exchange ideas, and ask questions about ActiveTigger.
For any other inquiry, please reach out at css@ensae.fr.